Showing posts with label Sewing. Show all posts

Thursday, September 1, 2016

Great Gifty Friends!

I was beautifully blessed with some fun gifts from friends this past weekend ^.^

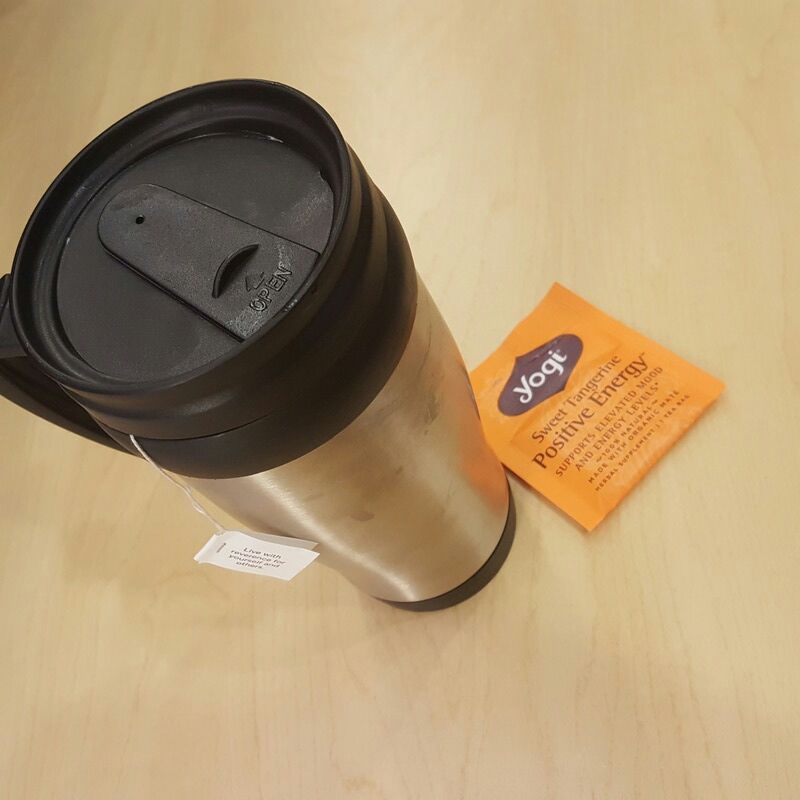
My friend Tiff gave me a couple samples of tea (Wild Chaild and Sweet Tangerine).  I drank the tangerine one already and it was delicious!!!  I will def be buying a box of that asap!  She also gave me a cutting from her mint plant.  All the excitement is mine!!! I'm going to plant the cutting and brew tea from the leaves ^.^  I keep envisioning myself drinking nice cups of tea from my huge mint bush while sitting on the front porch during a nice summer rain shower.  That sounds like a wonderful Sabbath afternoon...

tea time, yogi tea, gifts, good friends

The other gift came from my friend, Erica.  She found a bag of fabric while cleaning out her garage and gave me the whole thing! o.O  What what!!!  Talk about an awesome crafty gift ^.^  There were quite a few large pieces that I can use for bag making and also some that will be really nice for garments.  I'm so excited to dig into this new stash soon!

fabric, gift, good friends

Crafty, gardeny, tea loving friends are the BEST!!! lol :)

Friday, August 12, 2016

Finally I'm Finished: Bag Lady

Since kicking the door down to the knitting world, I have fallen down another rabbit hole...

The Wonderful Beautiful Practical World of Project Bags!!!

No more ziplock bags for me ^.^

A project back is a zippered, draw string, or other type of bag specifically to keep a crochet/knit project in.  Kinda makes sense huh?  Anywho, I first decided to make one to house my California travel project.  So I dug through my fabric stash and found a couple prints to use.

sewing, knitting, crochet, project bag, zipper bag, makeup bag, fabric, diy, handmade

For the pattern, I just googled instruction for making a zippered bag.  It came out pretty good for a first go :)  And now I'm completely smitten with the idea of keeping my things in project bags.

sewing, knitting, crochet, project bag, zipper bag, makeup bag, fabric, diy, handmade

Now, of course, I wanted to make more for new projects, and because these little bags were in my mind - I was bitten by the fabric stashing bug.  I started gathering fat quarter cuts and bits from Joann's remnant basket and jumped right into the sewing.  This time I used Nicole of Hue Loco's Holiday Bag pattern.  The pattern was written very well and the accompanying tutorial video helped with any questions I ran into.

sewing, knitting, crochet, project bag, zipper bag, makeup bag, fabric, diy, handmade

A couple days after starting my second project bag, I had 4 new bags made!  I love how they came out and I've been putting them to work regularly ^.^  I do want to make a couple more in a larger size for projects bigger than socks.  I've put together some preliminary fabric combos and hopefully I'll get to work on those in the coming weeks.  Well... after I buy a zipper foot for my sewing machine because I've been struggling along without one so far.

sewing, knitting, crochet, project bag, zipper bag, makeup bag, fabric, diy, handmade

Getting back into sewing has definitely rekindled my love for the craft.  I've been daydreaming of all the new clothes I could make with a bigger work space.  (I'm currently sewing on the corner of the dining room table.)

So yeah!! Happy crafting to me! ^.^

Friday, April 10, 2015

Finally I'm Finished: Furniture Rehab Pt. 2

A couple weeks ago, I introduced you to my current furniture rehab for the backyard. [Read that post Here]  At that time I had finished the repainting phase and was heading out to choose fabric for the cushions. I went to my local fabric & craft store to browse the canvas prints and setteled on a bold stripe pattern after pulling a few options.  It's fun but not obnoxious and masculine without being boring.
DIY Patio Furniture

To make the ottoman covers, I measured the old cushions and added half an inch for seam allowance.  I ended up needing four 19"x19" squares and 8 19"x4" rectangles.  Next, was the cutting & piecing together.
DIY Patio Furniture
The original cushions were quite old and ratty.  One had a tear in it and when I took off the fabric, there was definitely a dead lizard in there.  *ugh*  Suffice it to say I thoroughly washed the foam inserts and sent them through the dryer on sanitize.
DIY Patio Furniture
I'm just realizing that I didn't take any pictures of of the cushion covers for the folding chairs... -___-  Anywho, I bought a couple throw pillows from the thrift store and took out some of the stuffing so they weren't so big.  I made two envelope style pillow covers which took me way too long... but when I finally finished them, they were pretty good looking.  When all the sewing was done, the new cushions got a few coats of waterproofer and put into place.
DIY Patio Furniture
TA-DA!!!! They are Kiva and Tootie approved!  I'm really happy with how they came out and I cannot wait until Lamar and I get to spend some time outside in the evenings. I just have to get some new citronella candles to keep those pesky skeeters away. :)
DIY Patio Furniture

DIY Patio Furniture
This is officially the completion of my first furniture refinishing on my 30 Before 30 list!  It feels really great to be able to check something off.  Originally, I only planned to do one furniture refinishing project, but I think I want to do more.  It's fun and I get to give the pieces a new life.
Lastly, I love this picture of Tootie sitting on just the edge of the cushion.  She's such a weirdo, but I love her anyway :)


Sunday, May 11, 2014

Wedding Spot: DIY Wedding Veil

Hey there, it's wedding diy time again ^.^  Crafting my wedding one detail at a time (I'm corny, I know)

One of the first things I decided to definitely try to DIY was my veil.  I figured that a veil is, at its base, a piece of tulle, a comb, and a bit of trim.  I can handle that. I was an apparel and design minor in college after all! If I can't make a wedding veil, my teachers would be SHAMED! lol

In the midst of my dress search, I tried on a veil and unfortunately it weren't pretty... I totally felt like I couldn't breathe! I went all panicky and what not.  Afterwards I thought, "well I guess I need to walk around with a sheet over my face as practice..." *shrug*

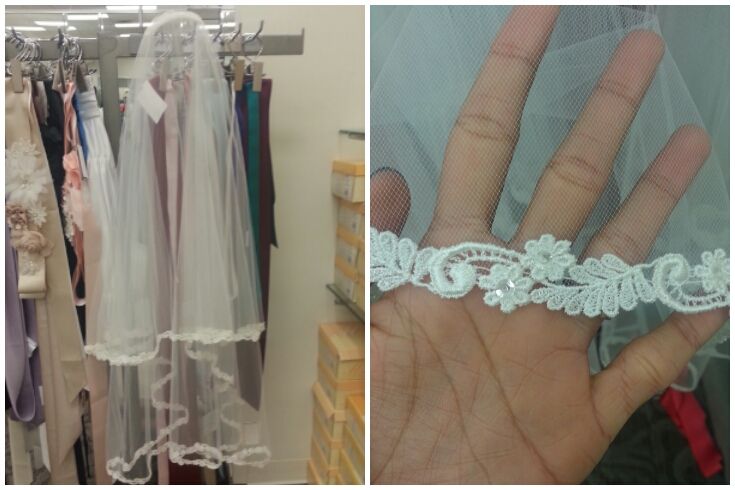
So back to the DIY.  I first took pictures of veils that I liked to figure out what style to create.  In the end, I chose a 2-tier elbow/fingertip length design.  This would allow the top tier to double as the blusher.  It would have a comb attachment and a nice floral trim.


Inspiration veil from David's Bridal

Of course, like a good DIY'er, I did quite a bit of pinteresting to find a usable pattern.  I found and really like this one. The instructions were clear and super easy to follow. Two thumbs up!  I got my tulle from Joann's because I cannot justify not using a coupon on my crafty purchases... The hair comb came from my local beauty supply store and the trim was from the fabric shop I wrote about a little bit ago <original post -here->.

So yeah, I jumped right on it.


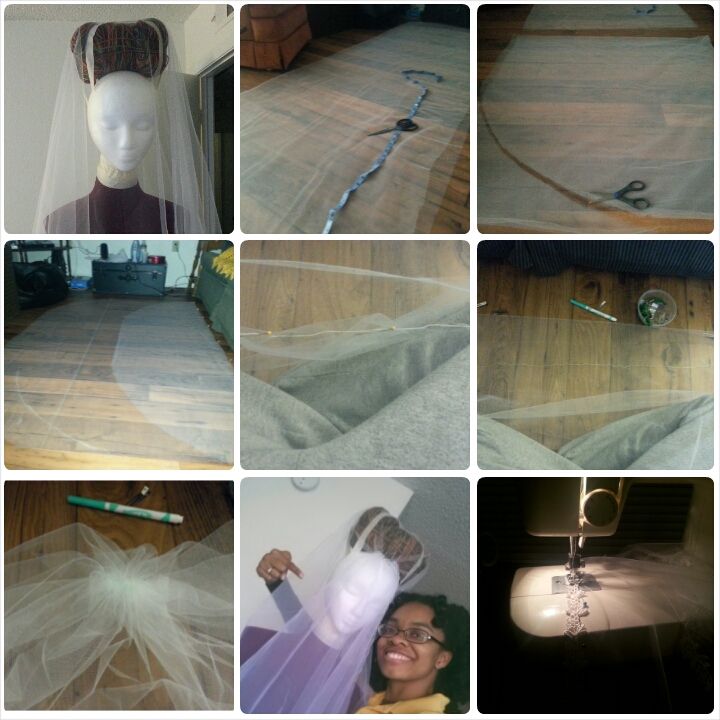
Picture 1: Determine the length you want for your blusher/top tier and back tier.
(I rigged up my dressform to simulate me with my wedding hair :) and draped the tulle over to determine how I wanted the veil to fall.  My dress is also on the form so I could make sure the details showed the way I wanted.)
Pictures 2 & 3: Lay out the tulle and cut to the desired length.  Round the edges.
Picture 4: Fold top tier over bottom tier and clip.
Pictures 5 & 6: Pin along the fold line and sew a wide running stitch to gather.
Picture 7: Gather tulle along the stitch line.  Sew back and forth a couple times to secure.
Picture 8: Attach the hair comb to the gathered area.
Picture 9: Sew on trim

The first hard part I ran into was gathering the tulle. Who woulda thought... It was SO fiddly and trying to hold and sew a straight line down that wispy fabric was enough to set my teeth on edge!  But eventually I got it done. [imagine accomplished face Caleisha here ^.^]  After I successfully gathered everything, I began the super-tedious task of pinning the trim to the edge.  Once I made my way about half way around, I noticed that there was way too much ruffling happening in the front.  That caused me to have to remove the whole gather -___- and redo with less material.

It took quite a bit of back & forth and trying different things before I had a veil that I could be proud of.  I'm very glad I decided to make my veil instead of just buying one.  There is just something about knowing that you yourself made aspects of your wedding details.

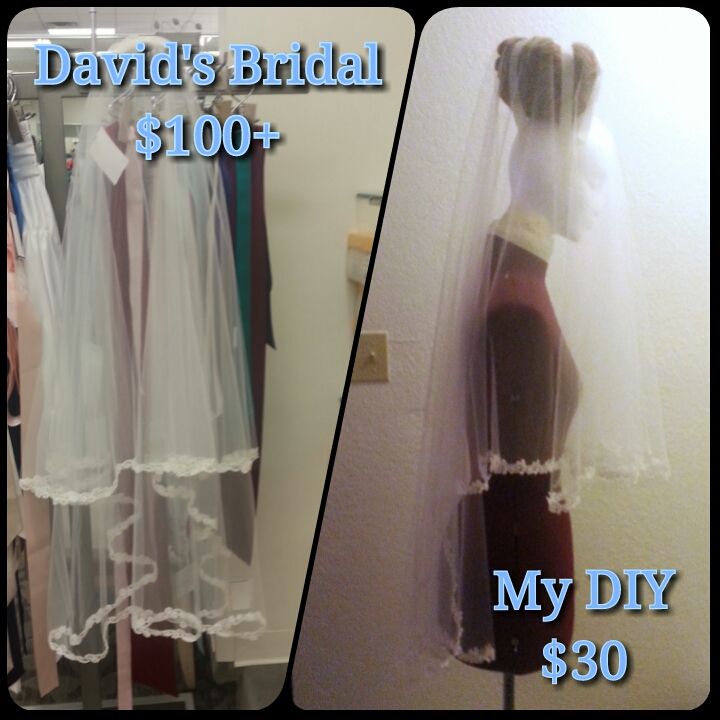
One of my favorite details of the finished veil is the price comparison to the inspiration veil.  As a thrifty gal, this seriously warms my heart *.* BOOO-YAAA!!!


I can't wait to see the veil with my dress on our wedding day! (1 month 4 days & counting ^.^)

Thursday, February 13, 2014

Hello, Fabric Heaven!

Hello Fabric Heaven!

Hey there!

Recently I visited a fabric store in Maitland called The Sewing Studio.  I was on the hunt for a lace trim for soon-to-come veil making, and this shop seemed like a good place to check out. And let me tell you I totally caught a case of crafter's ADD when I walked in!

There was soo much fabric! And in sooo many different patterns and materials. It was uh-MAZE-ing.  They also have a discount shop with all sorts of fabric, trims, & notions.  I can't even express how cool the shop was... & the ladies working there were very helpful.

So yeah, enjoy this colorful fabric yumminess!


Needless to say... now I want to...
via:Savory Stitches

Monday, February 10, 2014

Wedding Spot: DIY Ring Pillow & Tutorial

It's been a while since I last did a Wedding Spot post, so here is a bit on my most recent DIY.

Maybe a month and a half ago, I was walking around the wedding section of my local craft store and stopped to look at the flower girl baskets and ring bearer pillows.  Needless to say, they were rather expensive... and nondescript... blah.  So off to the Goodwill I went to find supplies to DIY these things.

Tonight I'll be talking about the Ring Pillow.  I first decided I wanted to DIY this after seeing these on pinterest.
via: Whollykao
I initially tried to crochet a doily with a clover pattern, but that didn't happen... at... all.  After that, I started looking at fabric ring pillows.  My first try was really crappy.  The idea of it was nice, satiny fabric with a ribbon trim.  Sounds lovely right?  In reality... it was more like a wonky marshmallow with the middle poked in... -___-

The next plan was to use felt.  My best friend brought the idea of felt flowers to my attention a while ago and I absolutely loved them :)  So I figured that if we all have felt bouquets and boutonnieres adding other felt touches would be a great idea.  Oddly, when I started making the felt pillow, I fell into a flow and it just came together. Yay me!

Materials
2 pieces of felt
Fiberfill pillow stuffing
Green thread
Green embroidery thread
Embroidery needle
Thin green ribbon
Shamrock patterns large and small
Letter patterns
Tissue paper
Scissors
Sewing machine or sewing needle

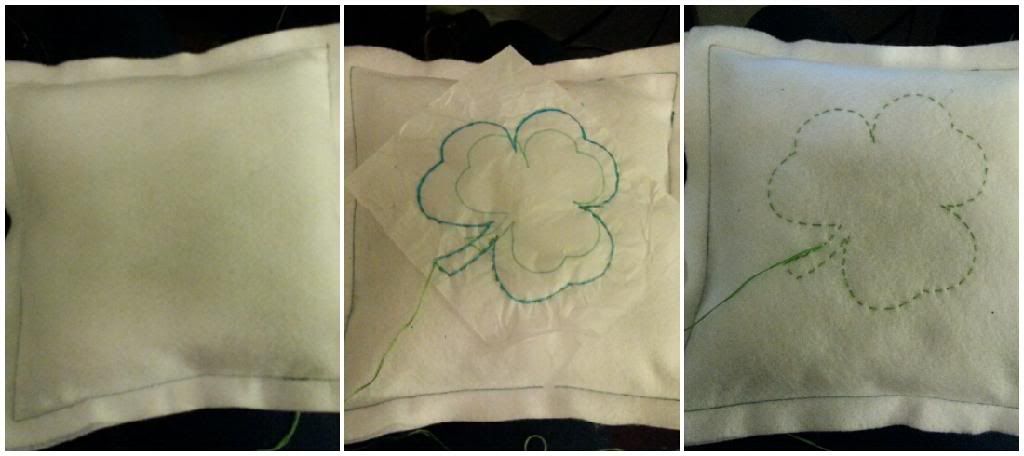
                                                      1.                                                                 2.                                                                 3.
Step 1:  Cut felt into two squares.  Sew together leaving a space to stuff pillow.  After stuffing, sew hole closed.
Steps 2-3: Trace large shamrock shape onto a piece of tissue paper & pin to top of pillow.  Using the green embroidery thread, do a running stitch around the outline.  After going all the way around the design, remove the tissue paper.

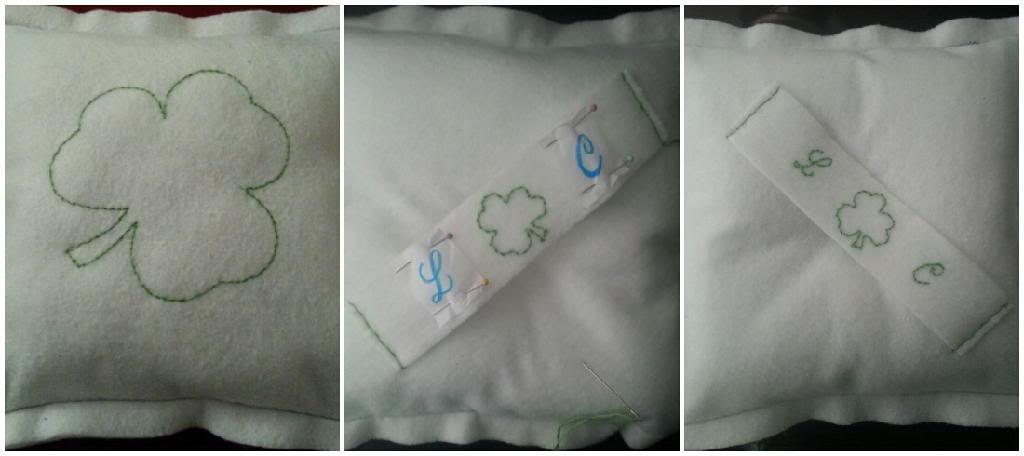
                                                      4.                                                                 5.                                                                 6.

Step 4:  Continue stitching around the shamrock shape with a running stitch between the stitches of the previous round.  I suppose you can also use a backstitch to begin with but I'm a new-be at embroidery.  So use whatever stitch you're comfortable with.
Step 5:  Using one of the felt scraps sew a handle on the back of your pillow.  Trace the small shamrock and initials onto tissue paper and pin to the handle.  Stitch the designs just as you did for the large shamrock.
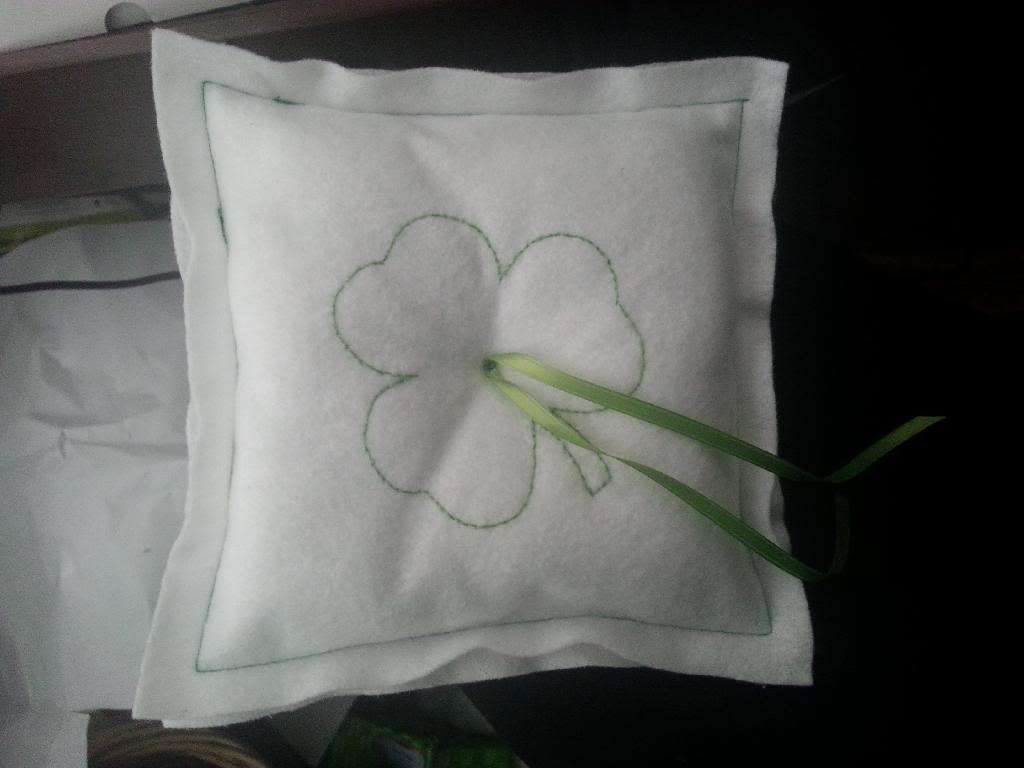
Step 6:  Cut a length of ribbon (enough to make a pretty bow around the rings).  Make a couple stitches through the middle of the shamrock.  Pull them tight to make a little dip.  Sew on the ribbon.

Ta Da!!!!

Step 7:  Step back and admire your awesome craftiness!

There we go! I'm super proud of myself for making this!  It's so cute and so me ^.^ Now I just have to settle on how I want the flower girl basket to look... :)

Friday, September 20, 2013

Finally I'm Finished! #1: Introduction

Hi! I'm (as you can see over the last few posts) starting new weekly topics on here.  So with the updates, Fridays have been dubbed 'Finished Object Fridays'.  I really want to come up with something more clever, but alas it's been a long day and I'm fresh out of cleva.

Anywho, it's just as it sounds, me showing my recently finished projects.  Hopefully, having this topic will help me with my collection of UFO's (unfinished objects) and create stock for my etsy shop. 

So for this first installment of Finally I'm Finished!, I'm showing my first DIY apron ^.^  Yay!  Sheree (my roommate) asked me to make her an apron to wear in her classroom.  She found it super frustrating to run out of pockets for things at work.  Now of course I couldn't just buy a pattern or look one up online, I had to dream it up from doodle to finished piece.

I pulled out my trunk o' fabric and she picked out a few bits, but I ended up getting some other pieces from Joann's (some lace trim and owl print fabric).


I basically cut out a bunch of rectangles: one of the main teal fabric, one of the backing burgundy fabric, a smaller one of the owl print for the pockets and a few long thin ones for the waistband/ties.


This is all the big pieces laid out... Obviously I suck at progress shots, because the next pictures I took were the whole finished piece. *shrug*


The finished apron has 3 large pockets for her to put all her what-nots and her tablet.  And the lace gives her a cute little retro feel.


I told her after I finished, that when I got around to sewing on the owl fabric I was a bit terrified that it was going to be upside down o.O  Luckily, I got it right.


I think it turned out pretty good for a first time apron doodled on a sticky note pad.  The next time I think I'm going to make the corners rounded and go bigger on the lace.

Alrighty, that's it for this week.  My goal is to have a completed project to feature every Friday.  Since I'm not having Crafternoons anymore, this will have to be it.  Hope you have a great weekend!

Peace!

Thursday, January 17, 2013

Sewing Fail Resurrection

Ok, like I said in the previous post, I messed up the dress I was making.  So to salvage it/ make it work (say it like Tim Gunn), I chopped it off at the waist, added a band, put the zipper back in, sewed in a couple darts, and ended up with this little number :)

photo from my instagram @nadiratani


Not bad huh?!?  It's really thin fabric, so it needs a slip.  I'm excited to wear it to work :) Yay for me!!


Wednesday, January 16, 2013

Sewing... Fail...

Well... we'll just call it a "learning experience"

Monday night I decided to make a pattern from a really cute dress I recently thrifted.  So I pulled out my tracing wheel and brown paper and got to work making the pieces.  I successfully traced the front, back, and sleeves.  Now... my intention was to reproduce the dress using this awesome 60's inspired fabric.

Photo from my Instagram @nadiratani

Ok... looks like a great idea right?  Nope... What I failed to take into consideration was the fabric of the original dress.  It was a super stretchy material and the fabric above is a cotton.  Needless to say, I cut all the pieces and sewed it together, even put a zipper in the back as an afterthought, but the dress was just too small.  I guess I need more practice in the pattern-making area (and zipper installation! I really suck at it!)

I'm not going to scrap it tho.  I'm going to chop it off at the waist, cut pocket shapes from the bodice as to not waste that fabric, and make a skirt with pockets.  Because who doesn't love a skirt with pockets?!

I will keep the pattern pieces tho.  I'll just make sure to find a stretchy material for the next try at this.  Besides, I have a couple coupons for Joann's maybe I can find something on clearance. *shrug*  I'll post a picture of the finished skirt, hopefully tonight.

I hope you are having a nice wednesday... it's still raining here.  It's been raining for nearly 10 days now.  Everything's soggy :-p ick...

Monday, August 20, 2012

Crafternoon #12: Upcycled Tote How-to

Hi there!

Today was very eventful for me: spinning, carding, flea marketing, & crafting :)

The project for this crafternoon was all about fusing the mountain of plastic bags from under my sink.  After watching a couple youtube vids about the process I got down to the business of ironing plastic grocery bags.

Supplies: iron, ironing board, scissors, parchment paper, & plastic bags.
Make sure you have ventilation- very important :)

The first step (which I just realized I don't have a picture of) is to cut off the handles and bottom seam of each plastic bag and turn any printing to the inside. According to the etsy tutorial, 8 layers makes the best material, so fold it twice and you're ready to press.
Step 2
Sandwich your folded bag between two pieces of parchment paper and iron on a medium setting (silk or wool). The plastic will shrink from the heat so make sure to move the iron quickly and evenly to maintain as much of the rectangular shape as possible.

Step 3
After fusing all of your bags, it's time to sew! Use a zig-zag stitch and sew your front panel and back panel together. Trim the sides evenly. (I also pressed over the seams to kinda close up the needle holes a bit.)

Here are my two panels.

Step 4
Cut pieces of fabric for the bottom and sides of the bag.  I used some velvet-like scrap fabric from my stash. (Hurray for stash busting!) Stitch them to the plastic panels with a zig-zag stitch. (I sewed the short pieces to the longer one to make a long strip... it was a bit easier for me to put together that way.)

Stitching stitching stitching
(Step 5) After you finish attaching the sides and bottom, cut two long pieces of fabric for the straps. Fold the strips in half (right sides together) and sew a running stitch down the long side. Turn it inside out so you have a tube. Press it flat and sew them onto your bag with that good ole zig-zag stitch.

I decided (as an after-though) to add a pocket to the front of my bag.  If you know you're going to want a pocket on your bag, it's best to sew it on before attaching the sides/bottom.  I definitely did it the hard way, lol.

Here is the final bag!
I tried 3 types of bags for this project: Wal-mart, Kroger, & Target.  I ended up using all Target bags because they were made from thicker plastic which kept its shape a lot better than the other two stores.  I think that the Wal-mart & Kroger bags could work better if I layered them more. Like maybe 10-12 layers instead of 8. 

If you try your hand at fusing your plastic bag stash, I'd love to see a picture.  I'm excited about how my bag came out and will definitely do this again. The only difference will be that I will have a specific design before I start sewing, lol.

All ready to go to the farmer's market or something like that ^.^
Goodnight!

Tuesday, June 26, 2012

Crafternoon #8

Hey there.

We finally had another Crafternoon with more than myself, hurray!  Today, my friends Dee & Mimi came over for some diy time. Mimi wanted to crochet a scarf to wear in the winter & Dee wanted to learn to crochet.  So we had a crafternoon crochet lesson.  It went really well & now both ladies are working on double crochet scarves ^.^

This is the direction that I dreamed Crafternoons would take. I wanted to provide a place where people could come and learn a craft or teach one. That way, we create a melting pot of diy ability.

Cherie took a picture of me teaching Dee how to crochet.
Our crafternoon guests crocheting away at their projects :)

I wrote earlier that I finished my first official handspun yarn. I twisted it up into a wee little hank and it was very cute ^.^
Cute little hanky :) I love Kiva's face in the background.
I found this briefcase sitting outside our dumpster one night.  I decided to spray paint it. A quick coat of paint is a really easy way to spruce up a find.  First, I painted it silver, then taped the striped pattern, & then sprayed it navy blue.
Here it is mid process.
And here is the completed paint job.
I have since taken off all of the tape. The clasps and metal feet are silver and the handle is still the original black.  I'm not entirely sure where I would use it. Plus, the inside is a black/white houndstooth pattern that no longer goes with the outside.   Maybe I'll cover the inside... that's still in the design works.

Cherie worked on refashioning a shirt she got from her Grandmother.  She did a lot of nipping, tucking, and grommet setting and created a very cute lace up tube top.  Unfortunately, I don't have any pictures of it yet, but I will.

This was a great Crafternoon. Next week, I hope to host another Crafternoon just as great. :)

Tuesday, June 12, 2012

Not So Blue Monday #7

Good evening there :)

It seems that I've been bitten by the quilting bug and this Not So Blue Monday has been made better for it.  Work went well, which is great to say. But on to my list!

Good things for Not So Blue Monday
  1. getting up an hour earlier than normal & easing into the day
  2. work productivity
  3. catching up with my photo-a-day on instagram
  4. talking to one of my college friends after a long while
  5. "Sew on & Sew Forth" poster for the craft area. (I got it -here-)
  6. clean doggies
  7. roommate being home & crafting with her
  8. watching Coraline
  9. sewing two more flowers into my quilt
  10. telling my mom & dad about my quilt progress & them being happy about it
  11. text msgs from Lamar about how he saved $2 on donuts
I feel like I could keep going!  Evidently, this was a really good Monday.  I think it was the easing into the morning that I did today. I took an extra long shower & spent most of it sitting down in the tub praying.  It was very relaxing... so much so that the annoying things that the office manager did today didn't bother me as much.  I guess I'll try to do this again tomorrow & maybe make it a regular thing... That is, if I stop having these late late crafting nights, lol.

But seriously... what are the chances of me crafting less??  Slim...
-------------

I tried to create a collage of photos that go with my list, but I'm sleepy now & don't feel like fussing with it anymore tonight... Maybe I'll add it tomorrow.

Goodnight :)

Saturday, June 2, 2012

Friday Night Project

Good afternoon :)

A few weeks ago, I snagged a HUGE bag of fabric from ThriftMart for $1.00 (originally $6, but I had a $5 coupon- yay me). When I took all the fabric out, I was so surprised at the amount that was in there. It was packed super tight ^.^ In addition to the fabric, there were quite a few handkerchiefs, cloth napkins, pieces of felt, & fabric place mats.
The majority of the fabric.

Anywho, I decided that after Amber's wedding I was going to try my hand at making a real patchwork quilt that is actually adult sized. (My last quilting project was tiny & is here.) My original idea for this quilt was to cut up all the fabric into 1'x1' blocks & arrange them in some kind of color-wise gradient pattern... I'm VERY glad I didn't do that. Why? Because once I cut up the red fabrics & laid them out I had just enough for a 5'x7' quilt... I spent something like 6 hours cutting & piecing together scraps to make full blocks last night.
This little guy was my left hand last night, lol.

I was determined not to waste a lot of fabric, so whenever I needed a few more inches on a block, I surged little pieces together.  Some of my blocks are actually made of 4 or more smaller scraps. I figure it's a scrap quilt so I might as well make use of ALL my scraps :)

As the night went on, and all my blocks were laid out, my trusty "crafting partners" came out to do their comfort tests...
Kiva & Toot
Evidently it passed their test, because they kept creeping back over to lay on it whenever I wasn't looking, chuckle...  Now that the layout was done, I started sewing them together.
**Wedding nails still hanging in there ^.^**
Strips all done.
By this time it was almost midnight & I definitely got in that mode where you're super tired, but you don't want to stop because the end is in sight. I almost gave up, lol...
Catnap time...
Okay! With the help of a marathon of "Storage Wars" I finished sewing together the quilt top. (That show is more interesting than I thought it was going to be.) I got Lamar to hold the top up for a photo. 
The finished quilt top.
You can see all the blocks that I pieced from scraps.  The extra seam lines make me think of Piet Mondrain.  I like that.  It came out really nice. Now I need to decide on a quilting pattern. I'm strongly considering hand-quilting it... mainly because I can't find a place to go & machine stitch it.  I don't want to send it off to someone to do it for me.

The next step is to get the batting & backing fabric & pin it all together.  I figure that that will be my crafternoon project for tomorrow. I'm nervous about the binding step, because my last 2 quilt bindings were a little shifty & fudged. So hopefully 3's a charm.

This post has gotten really long (sorry) but I hope you enjoyed seeing how I sewed my Friday night away.  Have a great weekend!