Showing posts with label how-to. Show all posts

Tuesday, October 13, 2015

DIY Lavender Bath Bombs with Recipe

Last month I purchased my first Lush bath bombs (YAY!) and like any good crafter/diy-er I set out to learn to make my own.  I watched a few videos on YouTube and read some blog posts.  After comparing the various recipes, I decided to give it a go.


The first evening I tried making these bath bombs was quite frustrating.  I mixed the ingredients according to the instructions.  and everything was going smoothly until I added the citric acid.  As soon as it went in everything turned into a fluffy expanding mess!  Not at all the dryish powder I saw in e...ver...y video. -___-   In this video you can see the mixture expanding like it's not suppose to.


At first I thought I added too much water.  So I used less in my second batch... aaaand the same thing happened. UGH!  Next I removed the coconut oil I chose to add it.  The recipe originally called for almond oil, but I subbed coconut oil... I nixed it in hopes of getting the mix right.  I still got the same results. ::throws a tantrum:: In the last batch, I swapped water for witch hazel as in one of the recipes I saw... Unfortunately, I still ended up with a soft fluffy bath bob :(


FAIL!!!!!!

By this point I just wanted to trash everything.  Chalk it up to "can't do it" and plan my next trip to Lush.  But I'm a bit too stubborn for that.  So I went back online to do some more research.  I came to the conclusion that I was still using WAY too much water/liquid.  So instead of spritzing arbitrarily from the water bottle, like the recipe I was following said, I mixed an exact amount.

------ The Next Day ------

SUCCESS!!!!!!  That simple change was the ticket!  I added the coconut oil back in and measured the exact amount of water.  The mix came out perfectly!  I had zero trouble getting the mix into the mold.  And the bomb came out beautiful *.*

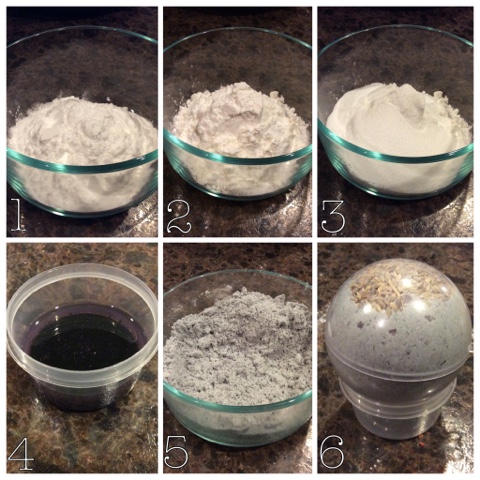
1. baking soda 2. corn starch 3. citric acid
4. water, oil, food color, essential oil 5. mix slowly 6. pack in mold

Now that I know what I did wrong, I want to make ALL DE BATH BOMBS!  I just need to decide what scents I want to get.  I'm so glad I didn't give up on this DIY. 

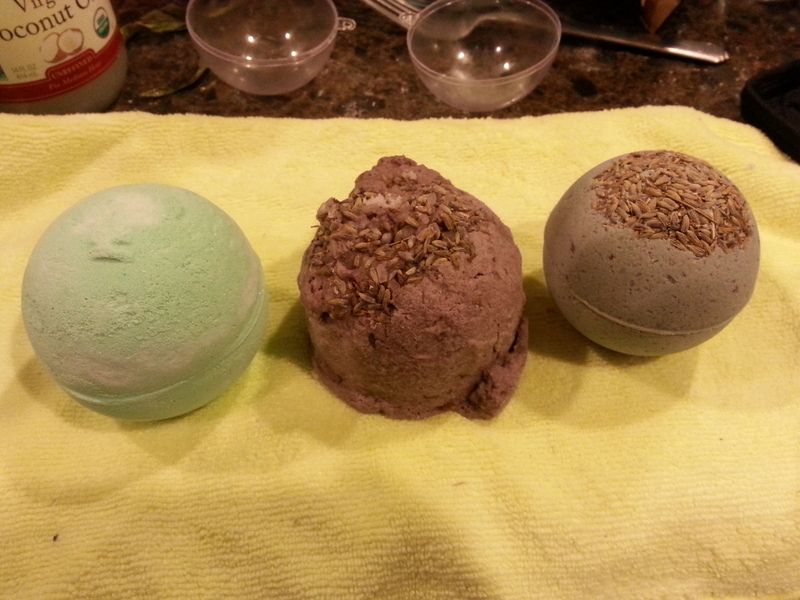
L-R: AvoBath from Lush, DIY fail, DIY success!


Tuesday, January 20, 2015

What's the Lesson?


So it kinda sucks for this to be the first post of 2015, but it is what it is.

Last week I had an interview for a company that does benefits administration.  I did all the recommended reading about the company and asked my brother-in-law to give me his perspective of working there.  I went over the practice questions the recruiter provided.  I refreshed myself on my past call center experiences.  I prayed.  I got there early.  I was personable and engaging.  I answered all the questions thoroughly.  I gave firm handshakes and good eye contact.  I asked follow up questions relevant to the business and policies.  I felt good afterward.

Buuuut... I got an email this morning saying, "after careful evaluation of your qualifications, we have decided that our current opportunities will now effectively utilize your skills and background."  It really sucked to see that as I started my day.

I'm really glad that when I woke up this morning, I had a little conversation with God about helping me stay on top of my anxiety (which has been threatening to flare up recently).  Then I did an hour of yoga.  During that time I meditated and focused on aligning my chakras and calming my mind.  After practicing, I had breakfast and a nice cup of green tea.

Then my peaceful state was shaken by that email.  After reading it and resisting the urge to cry/crawl back under the covers I started thinking "what's the lesson"??  I mean, there has to be a lesson or some point to any struggles that God allows you to go through.  So I'm sitting here, watching Tia & Tamera trying to figure out what the lesson could possibly be.

So far... I have..
  • Maybe He's trying to get me to focus on working for Him more than to better my current financial situation.  Maybe I need to look for employment that will allow me to be more Christ centered. 
  • Maybe He's trying to tell me that He is going to provide for my needs.  I've been looking for a new job so that I can make more money so that Lamar and I can move to our first place.  I've been taking a lot of responsibility to do that on myself.  Maybe God is saying 'remember Philippians 4:19'...
And my God will liberally supply (fill to the full) your every need according to His riches in glory in Christ Jesus.
  • Maybe He's just saying find a way to enjoy this time of ease.  Use it to do other things.  You're picking up more interest in your handmade goods.  Use this time as a gift.

That's all I've got.  I am feeling better after thinking of these lessons.  Please keep me in prayer while I continue pondering what lessons I can learn from these setbacks.

Oh! Happy new year :) *chuckle*

Tuesday, December 11, 2012

How to: Saving Money on Craft Supplies


So, as a crafter, I spend a lot of time shopping for specific yarn, fabric, or other crafty bits.  If I'm lucky, I can thrift a bag of yarn or fabric, but the downside to that is the yarn is most likely an older brand so whatever I get is all I'll have.  That leaves retail craft stores for filling my stash, and since I'm such a die-hard thrifter, I hate paying full price for anything if I can help it.

Enter CoUpOnS! 

I was never much of a coupon shopper in the past, but the more I pay attention, the more I figure out how to s t r e t c h my dollars.  So here are a couple tips for getting the most out of your craft budget and then I have something awesome to share.  Enjoy!

1) Sign up for the mailing lists.  If the store offers a mailing list, I've joined it.  For example, Jo-Ann's; I signed up for their list and it sends coupons in email and snail mail.  Often times, these will be doubles, which means more savings for me.  Just make sure that the bar-code numbers are different.

2) For smartphone users, download the apps.  The first application I got for crafting purposes was The Coupons App.  My main stores are Michaels, Hobby Lobby, & Jo-Ann Fabrics, and this app has coupons for all three.  There are also standalone apps for Hobby Lobby and Jo-Ann's (Michaels needs to get with it!), and the Jo-Ann's app often give more coupons than the Coupons app.  So check them all out. (All apps available in Google Play Store and Apple Store.)

3) Ask about combining.  Most of the time, the coupons will say "cannot be used with another coupon" or "one per customer per day," but what I've learned is that sometimes, you can combine certain coupons if you ask.  For example, I once had two 60% offs and a 40% off that were expiring the day I went into the store, I told the cashier that I didn't want them to go to waste and she let me use all three in the same transaction. It was a great day.

4) Check out the sales.  Sales are great an all, but it's terribly annoying when I want to use a coupon but the items I need are already on sale, and the sale percent is not as great as the coupon percent.  To remedy this, I occasionally peek at what is currently on sale and plan to go when the sale ends.

5) Visit the website.  Some craft stores like Michaels have printable coupons on their sites.

5) Make a plan.  It sounds a little OCD, but when I have a few coupons to use, I will plan which item will go with which coupon.  It helps me stay focused and not pick up random yarn that I likely will never use...

-------------------

Now, I went through all that to share with you the awesome savings I managed to swing the other day ^.^  Seriously, I went to Jo-ann's on Sunday and I'm still geeked about this today, lol.  Check it out:


So let me explain the awesomeness you are about to witness!  I went into Jo-Ann's with two 50% off reg price coupons and one 15% off your total purchase coupon (including sale items).  So I got a pound of black yarn (50% off) and some crochet hook grips (50% off).  I like to reserve any coupon that includes sale items for transactions with sales items to get the most savings.  Unfortunately, there wasn't any sale yarn that I wanted or needed so I took a peek at the fabric.  Lo and behold, there was a sale on the sale!  What?  The clearance red-tag prices were an additional 50% off!  So I got three different fabrics: a solid red, a large motif, and some red lace.  Now, evidently when you buy almost the rest of the fabric on a bulk, Jo-Ann's has a policy where they will offer you the remnant for 50% off whatever the sale price per yard of what your buying is (did that make sense??)  So I bought the rest of the bulk on the large motif and the solid red.

When I got up to the register, I was expecting to have to do two transactions. One for reg price items and another for the sale so I could use my 15% off coupon, but the lovely cashier let me use all of them together!  So... let me see if I can break this down...
Yarn = 50% off
Grips = 50% off
Fabrics = clearance + 50% off + additional 50% off on remnant
Total Purchase = 15% off

I spent $31.28 and saved $44.18... (let that sink in) I saved more than I spent! When does that happen?!?!?!  Turn up for coupons! ::does happy dance::  So yeah, this was long, but I think you guys understand my zeal for craft store coupons now, lol.  Try it out. ^.^

Monday, August 20, 2012

Crafternoon #12: Upcycled Tote How-to

Hi there!

Today was very eventful for me: spinning, carding, flea marketing, & crafting :)

The project for this crafternoon was all about fusing the mountain of plastic bags from under my sink.  After watching a couple youtube vids about the process I got down to the business of ironing plastic grocery bags.

Supplies: iron, ironing board, scissors, parchment paper, & plastic bags.
Make sure you have ventilation- very important :)

The first step (which I just realized I don't have a picture of) is to cut off the handles and bottom seam of each plastic bag and turn any printing to the inside. According to the etsy tutorial, 8 layers makes the best material, so fold it twice and you're ready to press.
Step 2
Sandwich your folded bag between two pieces of parchment paper and iron on a medium setting (silk or wool). The plastic will shrink from the heat so make sure to move the iron quickly and evenly to maintain as much of the rectangular shape as possible.

Step 3
After fusing all of your bags, it's time to sew! Use a zig-zag stitch and sew your front panel and back panel together. Trim the sides evenly. (I also pressed over the seams to kinda close up the needle holes a bit.)

Here are my two panels.

Step 4
Cut pieces of fabric for the bottom and sides of the bag.  I used some velvet-like scrap fabric from my stash. (Hurray for stash busting!) Stitch them to the plastic panels with a zig-zag stitch. (I sewed the short pieces to the longer one to make a long strip... it was a bit easier for me to put together that way.)

Stitching stitching stitching
(Step 5) After you finish attaching the sides and bottom, cut two long pieces of fabric for the straps. Fold the strips in half (right sides together) and sew a running stitch down the long side. Turn it inside out so you have a tube. Press it flat and sew them onto your bag with that good ole zig-zag stitch.

I decided (as an after-though) to add a pocket to the front of my bag.  If you know you're going to want a pocket on your bag, it's best to sew it on before attaching the sides/bottom.  I definitely did it the hard way, lol.

Here is the final bag!
I tried 3 types of bags for this project: Wal-mart, Kroger, & Target.  I ended up using all Target bags because they were made from thicker plastic which kept its shape a lot better than the other two stores.  I think that the Wal-mart & Kroger bags could work better if I layered them more. Like maybe 10-12 layers instead of 8. 

If you try your hand at fusing your plastic bag stash, I'd love to see a picture.  I'm excited about how my bag came out and will definitely do this again. The only difference will be that I will have a specific design before I start sewing, lol.

All ready to go to the farmer's market or something like that ^.^
Goodnight!

Wednesday, May 16, 2012

Redo: Cassette Tape Case to Mini Briefcase

Hi there! I hope you had a nice Tuesday (I almost wrote Monday... where is my head??)

Anywho, I have a cute little DIY refashion type project to show you :)

Supplies: Scissors, Hot glue gun, fabric, small cassette case or something similar.  Not pictured: iron/ironing board.

But first, a little back story.

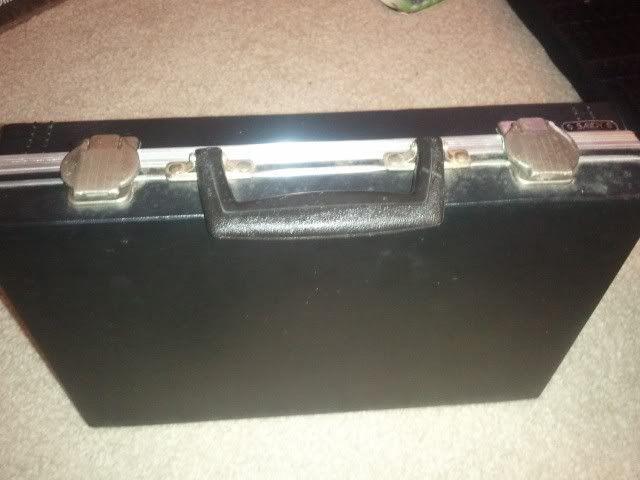
A few weeks ago, I picked up this cassette tape case at ThriftMart for $0.99 since I'd been eying all the "fabric covered suitcase" tutorials online.  I figured, it's small enough to be a first try.  Here's the case (I didn't take a picture of the inside because it was pretty grubby).


After cleaning it up with alcohol & giving it a thorough scrub with a brillo pad, I decided that I didn't want to mod podge fabric over it.  Plan B: recover the inside.

I gutted it except for the velvet-ish fabric in the top & added a new piece of cardboard to the bottom to smooth it out.  Now it was time to pick though my HUGE fabric stash for the perfect companion to the little case.

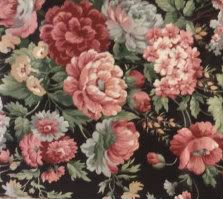
I settled on this one.  It's also thrifted... I think I paid $1 or $2 for like 3 yards of it a while ago. Anyway, I covered the inside with it.
Fabric swatch.

So, after cutting/folding/pressing the fabric, I glue it in place.  As a finishing touch I cut out a couple of the big flowers from the center motif & glued them to the lid.


Finished! Hurray!
Ta-Da! Here is the finished piece!  I think it's lovely.  I also have NO idea what to put in it o.O

But seriously, it feels really good to get that creative time in tonight especially since work was particularly draining today.  Since deciding to remove the specific "Have To's" from this blog, I feel a freshness.  Now it is just day one of this time of renovation, but it's good.

Now, for anyone that may want to do this project, here are the steps.  It's really, really simple.
  1. Remove any messed up original lining & thoroughly clean your case.
  2. Pick a piece of fabric for your new lining. Cut it to fit the bottom of your case with an additional inch on all sides. (It's fine to eye this. I didn't do any real measurements at all. Sewing teacher be shamed, lol)
  3. Fold each of your sides in one inch (right sides together) & press the fold with an iron.
  4. Fold each of your ends back the other way 1/2 inch (wrong sides together) & press that fold.
  5. Use hot glue to hold the extra bits of fabric in your corners. Now you have a fabric box that can fit in the bottom of your case.
  6. Drop the lining box into the case & hot glue around all the sides. 
  7. Cut out a design from your fabric scraps & hot glue onto your lid. And wham bam, you're done!
Now you have a cute, recycled, lined case for whatever your little storage needs!  If you've done something like this before, leave a link or a picture. I'd love to see your work.

~Goodnight :)