Showing posts with label Wedding Spot. Show all posts

Sunday, May 11, 2014

Wedding Spot: DIY Wedding Veil

Hey there, it's wedding diy time again ^.^  Crafting my wedding one detail at a time (I'm corny, I know)

One of the first things I decided to definitely try to DIY was my veil.  I figured that a veil is, at its base, a piece of tulle, a comb, and a bit of trim.  I can handle that. I was an apparel and design minor in college after all! If I can't make a wedding veil, my teachers would be SHAMED! lol

In the midst of my dress search, I tried on a veil and unfortunately it weren't pretty... I totally felt like I couldn't breathe! I went all panicky and what not.  Afterwards I thought, "well I guess I need to walk around with a sheet over my face as practice..." *shrug*

So back to the DIY.  I first took pictures of veils that I liked to figure out what style to create.  In the end, I chose a 2-tier elbow/fingertip length design.  This would allow the top tier to double as the blusher.  It would have a comb attachment and a nice floral trim.
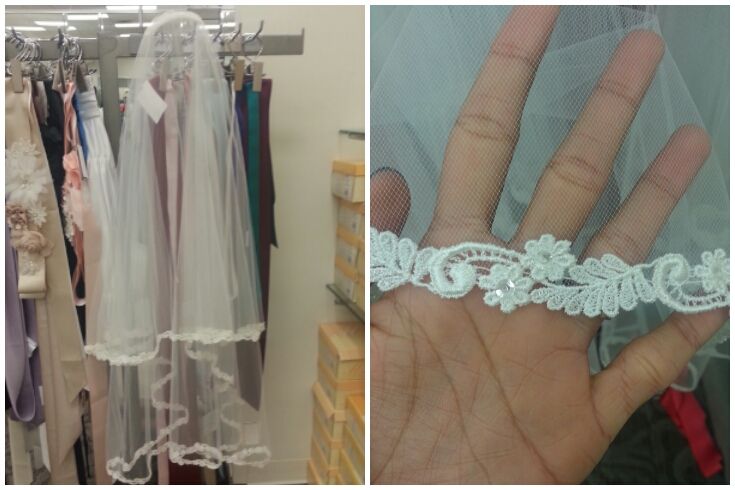

Inspiration veil from David's Bridal

Of course, like a good DIY'er, I did quite a bit of pinteresting to find a usable pattern.  I found and really like this one. The instructions were clear and super easy to follow. Two thumbs up!  I got my tulle from Joann's because I cannot justify not using a coupon on my crafty purchases... The hair comb came from my local beauty supply store and the trim was from the fabric shop I wrote about a little bit ago <original post -here->.

So yeah, I jumped right on it.
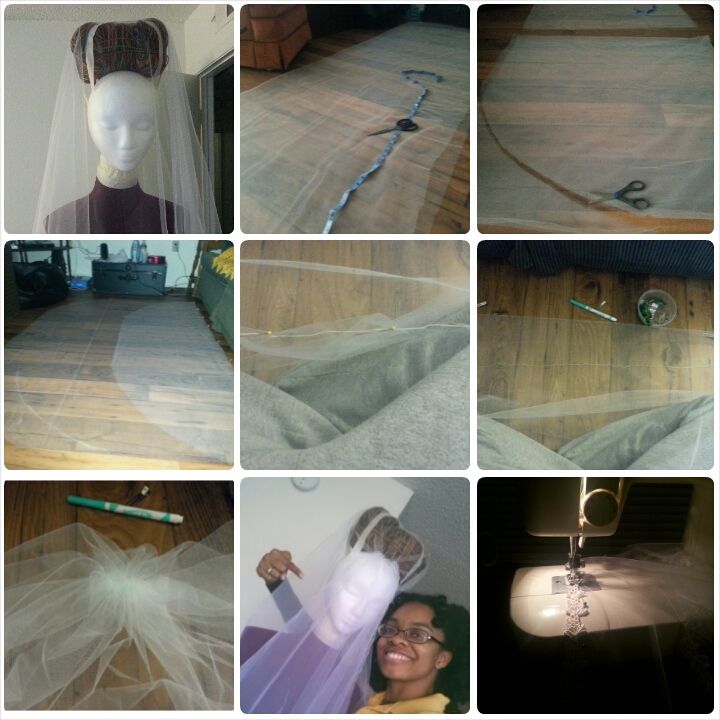

Picture 1: Determine the length you want for your blusher/top tier and back tier.
(I rigged up my dressform to simulate me with my wedding hair :) and draped the tulle over to determine how I wanted the veil to fall.  My dress is also on the form so I could make sure the details showed the way I wanted.)
Pictures 2 & 3: Lay out the tulle and cut to the desired length.  Round the edges.
Picture 4: Fold top tier over bottom tier and clip.
Pictures 5 & 6: Pin along the fold line and sew a wide running stitch to gather.
Picture 7: Gather tulle along the stitch line.  Sew back and forth a couple times to secure.
Picture 8: Attach the hair comb to the gathered area.
Picture 9: Sew on trim

The first hard part I ran into was gathering the tulle. Who woulda thought... It was SO fiddly and trying to hold and sew a straight line down that wispy fabric was enough to set my teeth on edge!  But eventually I got it done. [imagine accomplished face Caleisha here ^.^]  After I successfully gathered everything, I began the super-tedious task of pinning the trim to the edge.  Once I made my way about half way around, I noticed that there was way too much ruffling happening in the front.  That caused me to have to remove the whole gather -___- and redo with less material.

It took quite a bit of back & forth and trying different things before I had a veil that I could be proud of.  I'm very glad I decided to make my veil instead of just buying one.  There is just something about knowing that you yourself made aspects of your wedding details.

One of my favorite details of the finished veil is the price comparison to the inspiration veil.  As a thrifty gal, this seriously warms my heart *.* BOOO-YAAA!!!
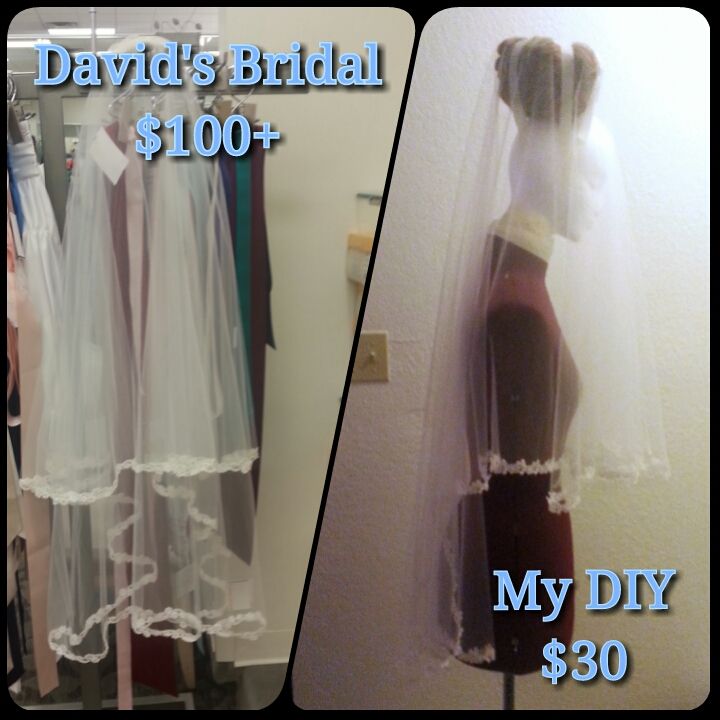


I can't wait to see the veil with my dress on our wedding day! (1 month 4 days & counting ^.^)

Wednesday, April 30, 2014

WIP Wednesday: The Metamorphosis of an Idea

(As usual I have fallen off the blogging bus... but in my defense... there has been quite a bit of wedding to do around here.  And I started a new job, nothing fancy, but it'll do.  I have been handwriting posts in my notebook, but sadly they take forever and a day to get to the computer. *shrug*  I really enjoy writing/keeping this blog, so I'm just going to have to figure a way to make myself do it...  Anywho, on to the actual post!)


So I find it really cool how some ideas seem to grow and develop rather organically.  I mean you start with a thought like this, "I'm gonna tie these thank you tags on with a ribbon.  Than some alphabet charms catch your eye and they get tossed into the mix.  So you sit down and try multiple times to tie a nice ribbon bow.  You know, one that will show off the charms, only to realize... It doesn't quite work.  So back in the bag they go.

Something doesn't click... What is it???

The next idea is to use a bit of chain to hang the charm just below the thank you tag.  Brilliant solution right?!

Not so much... GAH! What's missing?!?!  Back in the bag they go again.

The thing about creation is that sometimes the stars align and suddenly, while packing up beads to give to a friend, it hits you!  They're not suppose to be tied on with a silly bow!  These pieces are meant to be keychains!

Victory!!!

And then this happens.

 So yeah :) These key chains are a part of the gifts I'm creating for my bridesmaids.  I'll be posting a full look-see on the gifts soon.  Hopefully the girls will like them.  A lot.  Like really ^.^

Monday, February 10, 2014

Wedding Spot: DIY Ring Pillow & Tutorial

It's been a while since I last did a Wedding Spot post, so here is a bit on my most recent DIY.

Maybe a month and a half ago, I was walking around the wedding section of my local craft store and stopped to look at the flower girl baskets and ring bearer pillows.  Needless to say, they were rather expensive... and nondescript... blah.  So off to the Goodwill I went to find supplies to DIY these things.

Tonight I'll be talking about the Ring Pillow.  I first decided I wanted to DIY this after seeing these on pinterest.
via: Whollykao
I initially tried to crochet a doily with a clover pattern, but that didn't happen... at... all.  After that, I started looking at fabric ring pillows.  My first try was really crappy.  The idea of it was nice, satiny fabric with a ribbon trim.  Sounds lovely right?  In reality... it was more like a wonky marshmallow with the middle poked in... -___-

The next plan was to use felt.  My best friend brought the idea of felt flowers to my attention a while ago and I absolutely loved them :)  So I figured that if we all have felt bouquets and boutonnieres adding other felt touches would be a great idea.  Oddly, when I started making the felt pillow, I fell into a flow and it just came together. Yay me!

Materials
2 pieces of felt
Fiberfill pillow stuffing
Green thread
Green embroidery thread
Embroidery needle
Thin green ribbon
Shamrock patterns large and small
Letter patterns
Tissue paper
Scissors
Sewing machine or sewing needle

                                                      1.                                                                 2.                                                                 3.
Step 1:  Cut felt into two squares.  Sew together leaving a space to stuff pillow.  After stuffing, sew hole closed.
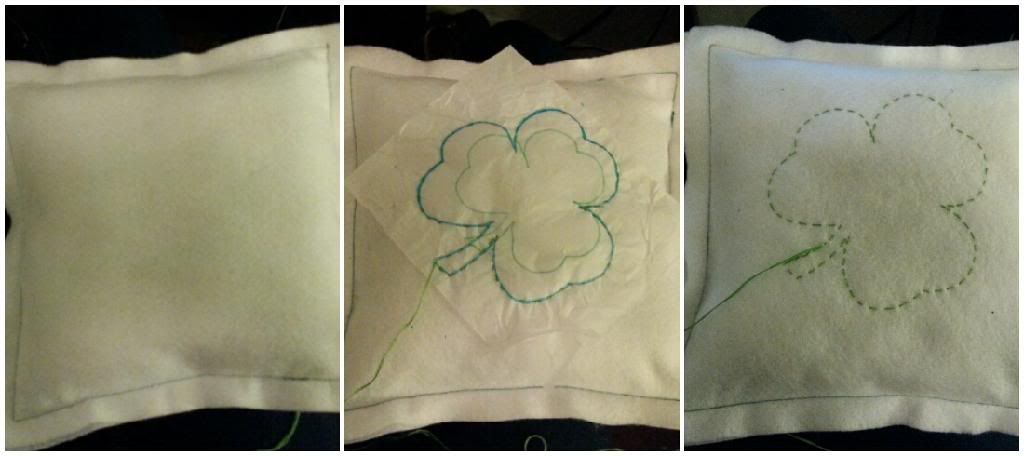
Steps 2-3: Trace large shamrock shape onto a piece of tissue paper & pin to top of pillow.  Using the green embroidery thread, do a running stitch around the outline.  After going all the way around the design, remove the tissue paper.

                                                      4.                                                                 5.                                                                 6.

Step 4:  Continue stitching around the shamrock shape with a running stitch between the stitches of the previous round.  I suppose you can also use a backstitch to begin with but I'm a new-be at embroidery.  So use whatever stitch you're comfortable with.
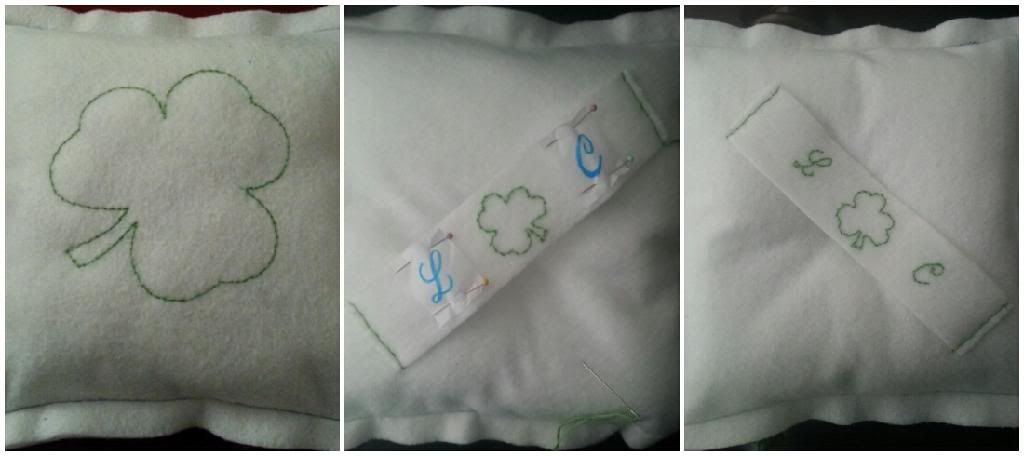
Step 5:  Using one of the felt scraps sew a handle on the back of your pillow.  Trace the small shamrock and initials onto tissue paper and pin to the handle.  Stitch the designs just as you did for the large shamrock.
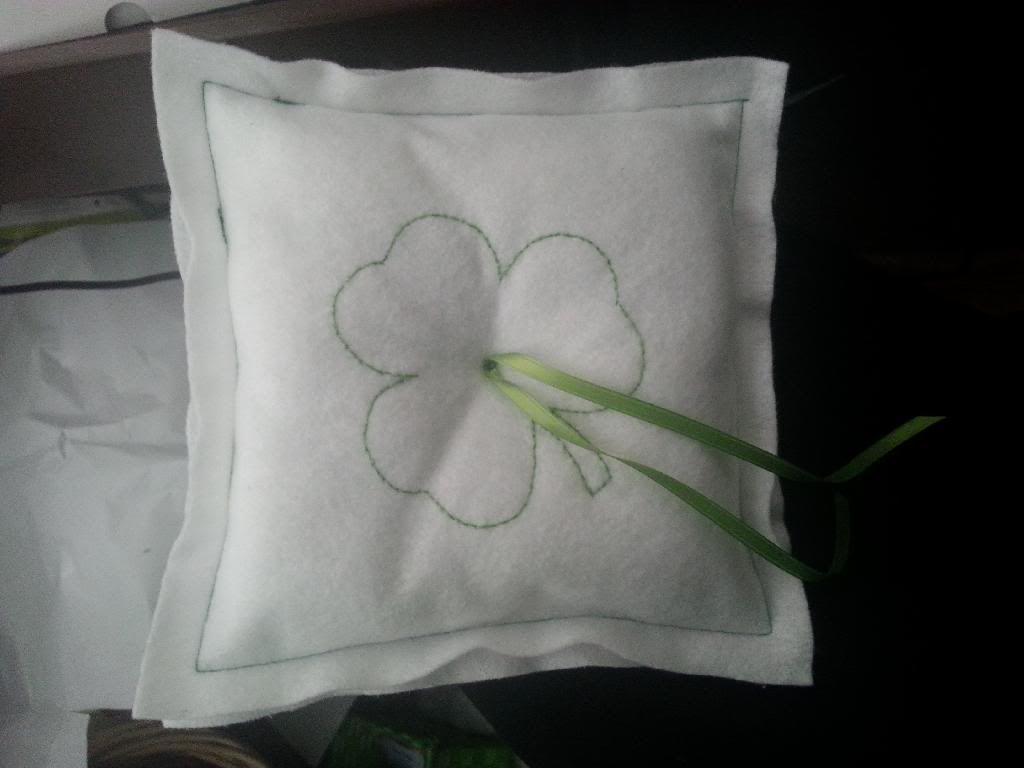
Step 6:  Cut a length of ribbon (enough to make a pretty bow around the rings).  Make a couple stitches through the middle of the shamrock.  Pull them tight to make a little dip.  Sew on the ribbon.

Ta Da!!!!

Step 7:  Step back and admire your awesome craftiness!

There we go! I'm super proud of myself for making this!  It's so cute and so me ^.^ Now I just have to settle on how I want the flower girl basket to look... :)

Sunday, November 3, 2013

Wedding Spot: DIY Save the Date Magnets

Hey there :) 

Happy Sunday! I hope you all enjoyed the time change.  I def woke up in a panic at what I thought was 9 o'clock this morning. Not.Pleasant.  Anywho, onward!

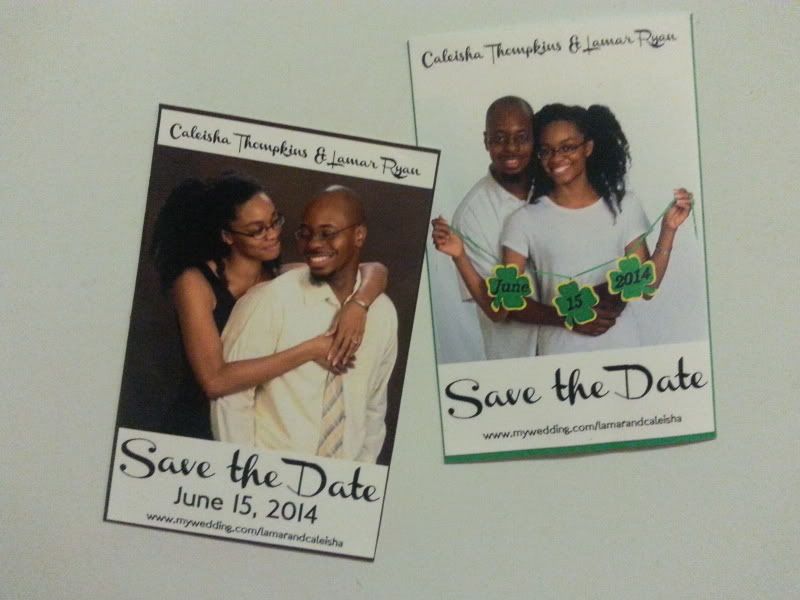
From the beginning, I knew that I wanted to have various  DIY touches in our wedding.  One of the "easiest" places to do a lil DIYing is with the save the dates.  A couple of months ago, Lamar and I had engagement pictures done at JCP that I spent hours pre-planning the session, picking outfits, doing hair, and making props.  I'm glad to say that I'm super happy with how they turned out.  I knew I wanted to use some of the photos as our save the dates and Lamar suggested we make them into magnets.  (He so smaaht!) Then the search for the least expensive way to make that idea a reality began.

I browsed many a 'create your own magnet' website, but was routinely let down by prices over $100.  So I sadly scrapped the idea of having them printed as magnets & started fleshing out how to print them as regular photos and somehow make them magnets myself.

First thought: Magnetic tape on the back... too cheap looking...
Second thought: Adhesive magnetic paper... WAY too expensive...
Third thought: Magnetic printer paper and rubber cement... Jackpot!

So with my idea having an actual plan, I looked for coupons for printing the 4x6s and found one for $0.10 each at Walgreens & purchased a small pack of magnetic paper from Staples. 

It took a little research to figure out how t do a permanent pond with rubber cement, but once I got it down,  I whipped up magnets using all the paper I had.  Seeing how awesomely the test magnets came out gave me confidence to go ahead & get the bulk amount of magnetic paper.  I told Lamar about my magnetic paper search and he was able to find cheap rolls of magnetic paper sheet.  o.O Why I couldn't find it? I'll never know.  So in the coming weeks there will be lots of rubber cementing and cutting at my house! 

I am really glad I decided to go the DIY route rather than choosing a ready-made design from a website.  I think they will make my family and friends smile since they all know I'm rather crafty :)  In total, all supplies considered, our save the date magnets cost us less than $0.60 each.  Pretty cool right!  It's very gratifying to be able to say "I made that!"

Our two designs :)
Anywho, have a good night.  I'm gonna go pass out as my body feels like its past 11pm. 

(I'll post the actual DIY steps later on this week.)

Sunday, October 27, 2013

Wedding Spot: Favorite Picture


I love me some him ^.^

This is one of the pictures from our engagement photo shoot at JCP.  I've started making our Save the Dates ^.^ I'll write more about them later on.  I just wanted to share this picture because it makes me smile whenever I look at it. :)

Hope you had a great Sunday!

Sunday, October 13, 2013

Wedding Spot: Bridal Show

Hey there!

A few Sundays ago, Sheree and I went to one of the Central Florida wedding shows. It was a good size show and there were a lot of vendors I hadn't met previously. Needless to say, we had a ball!


Sheree is so very much extroverted and participated in nearly every game during the fashion show! AND.......... she won a dance contest (which I recorded, but she told me I am NOT allowed to post -_-) and got a free stay at the hotel as her winnings! Pretty cool. She also caught a bouquet and a garter towards the end of the show, which was cool too.


After the fashion show, we walked around to check out the rest of the vendors, tasted some YUMMY cake from a few different bakeries, and chatted with the DJ. The last booth we went to was a photographer and she was having a raffle. While I was filling out the information sheet, the lady asked me if I won anything. I told her I hadn't and Sheree had all the winner's luck :) Then the most awesome thing happened! She pulls out a folder and said the person who was suppose to win a prize from her booth never came. So she gave it to me!! It was a voucher for a free outdoor photo session and an 8x10 print. How cool is that!? I was mostly excited because Lamar really wants to do an outdoor shoot. So I suppose we'll find out how much more prints would be. (Hopefully not an arm and a leg.)

 Goodnight :)

Sunday, October 6, 2013

Wedding Spot: Bridesmaid Dresses

Wedding stuff!!! Huzzah! lol ^.^

Last Sunday, I went to David's Bridal with my Maid of Honor and one of my Bridesmaids to have a look at a couple dress options for them.  Originally, I had two satin dresses picked out, but decided that I didn't like how they looked next to my dress.  So back to the drawing board I went.  The next option was to check out the chiffon ones.  Let me say, I really liked the feeling I got from them as opposed to the structured satin.  I think the chiffon was more of my personality... if that makes any sense at all. *shrug*

Anywho, we took to the racks at DB and found the dress choice for my Matron and Maid of honor pretty easily, but the bridesmaid dress took a bit more time.  Once we found the style number, I pulled it off the bar only to discover it had some sorta frilly... ruffled... jellyfish-esque detail down the back. Umm... what?!? To be honest, it looked pretty trash on the hanger, but we saw it on a mannequin and it looked ok so we kept it to try on.  Since the maids' dress was iffy, we took some time to find another option.  Then it was on to the dressing rooms!

The light blue dress is the Matron/Maid of Honor dress and the darker dress is option 1 for the bridesmaids.  See the jellyfishy ruffle?!?  Imagine my surprise when we pulled that off the rail...

Here is the MOH dress with the option 2 dress.  This was the dress we found in the store that day.  I'm pretty sure that these are the dresses we'll be going with. ^.^

After fiddling around with the pictures on pixlr.com, I changed the hue on them so I could see the dresses in what would be the wedding color.  Don't mind the purple skin ^.^
They look nice in the green :)  I really like that I feel good when I look at the dresses. Like I'm getting stuff done and making decisions. ::fist pump::

Wish me luck and focus as I continue this wedding planning adventure. Thanks!

Sunday, May 5, 2013

Wedding Sundays #1: We Have Colors!

Picking our wedding colors was pretty fun.  Lamar & I knew we wanted spring green in the scheme somewhere, but other than that we were an open book.  In comes good ol' Google! I searched "summer wedding color schemes with green" and after a.lot.of.scrolling. through the images, Lamar spotted this picture:
via

He immediately liked it.  So we went with the navy and spring green as our first colors.  Then we added in a pastel yellow and a bright yellow for accents.  After a couple days we sorta flipped it around and now the navy is moreso the accent color with the yellows and green as the main colors.

One of my favorite parts of choosing colors was the fact that it gave me an excuse to traipse off to Wal-mart and get ALL the paint chips!  (crafter happy dance moment)  All de colors!!!!!  Not only did I get the paint chips in our colors... I also used my heart shaped paper punch to cut them into a bazillion hearts *.*

I know... I totally had a compulsive craft moment. What can I say?  I made this:

 Ta-Da! Wedding color paint chip crafty bits! Yaaaaay!  So yeah, those are our colors :)